There are three skill and knowledge components to working with textures as they regard Anachronox. They are Texture creation, Texture Manipulation, and Texture Application. Only the third, Texture Application, is absolutely necessary for making maps. You need not master all three.
Brush Primitives
With the release of version 192, the Q3Radiant editor takes a new direction in the way textures are mapped to the surfaces of brushes. The texturing format will roughly be the same as the way textures are handled on curve patches. While there are no changes to the user interface within the editor, you should see a change in the way textures behave on brushes during transformation operations like move and rotate. Because textures are mapped to the S and T coordinates of a brush (as they are with curve patches), locked textures will now maintain their positions on brushes when they are moved or located. Even complex rotations should now be possible without the textures going askew. Checking the Brush Primitives checkbox turns on this feature. (Menu: Project Settings… > Use brush primitives in map files). Once you change a map to Brush Primitives, you cannot go back to the earlier method of texture mapping with that map. The prudent mapper makes backups before making major changes to projects.
Not sure if the new brush primitives are compatible with Anachronox. More testing on the subject needs to be done.
Texture Creation
Any combination of graphic programs and plug-ins that can output a 24 bit MS windows compatible Targa (.tga) or JPEG (.jpg) graphic file. If you plan to make textures that will have an alpha channel component , you must have a program that can create 32-bit art with that fourth channel.
Adobe PhotoShop has the ability to easily create alpha channels. Paint Shop Pro from JASC (v5.0+) can also make an alpha channel by creating a mask and naming it “alpha”.
Generally speaking, regardless of the program used, we found it best to do most of the art manipulation of the alpha channel in a separate layer or file and then paste it into the alpha channel before saving.
Rules
Follow these rules when creating textures for the Anachronox engine:
- Save your textures into your new [map name] directories.
- For best quality, save textures without an alpha channel as 24 bit TARGA files. Using JPEG files can save memory space, but at the risk of losing detail and depth in the texture.
- Textures containing an alpha channel must be saved as 32 bit TARGA files.
- Size textures in powers of 2. Example: 8x8, 16x16, 32x32, 64x64 pixels and so on.
- Textures don’t need to be square. A 32x256-pixel texture is perfectly acceptable.
Guidelines
The following are some things the id designers learned about textures.
- Create textures in “suites” built around one or two large textures with a number of much smaller supporting detail or accent textures.
- Very large textures are possible, but some video cards compress textures larger than 256x256 pixels.
- Textures are grouped alphabetically by name in the texture display window, so you may want to give suites of textures similar names.
- Unless you are creating special effects or textures designed to draw the player’s eye to a specific spot, muted, middle value colors work best with the game engine.
- Extremely busy (a lot of fussy detail) textures can break up or form visually unpleasant patterns when seen at distances.
Texture manipulation on b_models is done by creating an Anachronox Texture Definition file. Texture Definition files allow you to replace existing map textures with a proceedural texture. Procedural textures provide interesting visual effects by modifying the color values of a texture in real time. Use Procedural textures to create texture special effects; Lava, animated snow on a television, blinking controls on a terminal, etc.. Some procedural textures can even be controlled from APE, which can greatly enhance the interactive feel of the game.
If you plan on creating your own textures, you should get to know and understand how proceedural textures work. See Visual Effects/Procedural Textures for an explaination on how to manipulate textures.
Texture Application
These tools manipulate textures within the editor. They do not create textures or shader scripts.
Escape(ESC)
This is the all-purpose deselect key. Use it to back out of operations you don't want to complete or to stop working on a brush face, a brush, a patch, or a group of brushes or patches.
View Textures(T)
This is only used in the four-view and floating windows modes (as set in Preferences). It brings up the Texture selection window (also accessible from Texture/Console/Entity window). If the Entity window is open, you may need to click on a map view window first for the "T" command shortcut to work.
Show in Use(Menu: Textures->Show in Use)
(U)
This command affects the content of the Textures window. It filters the contents so that only those textures currently in use in the map are displayed in the window.
Show All(Menu: Textures->Show All)
(CTRL+A)
This command affects the content of the Textures window. The effect "un"-filters the contents so that all the texture directories previously loaded during the mapping session are re-displayed.
Surface Inspector(Menu: Textures->Surface Inspector)
(s)
This brings up a pop-up dialogue box. This is one of the more complicated interfaces used during map development and may take some getting used to.
Texture
This is the path/name (beginning in the anoxdata/textures directory) for the texture. You can copy from this field or paste into it. If you know the pathname of a texture, you can enter it here. It will load without having to first load the entire directory that contains it.
The next five commands work on both patches and brushes. However, the results of applying a Horizontal Shift to a brush and to a patch may be substantially different. When working with patches, the numbers in the fields do not change … although the texture on the map component may be changing.
Design Note: When a curve patch butts flush up against a piece of solid geometry, as if it were an extension of that geometry, it may be difficult to align the textures exactly. In fact is often extremely difficult to align a texture on a patch with the texture on an adjacent geometry brush. It works best when the dimensions of the patch are an exact multiple of the dimensions of the texture being used. Otherwise, you may want to consider designing your architecture in such a way that it is logical for a new texture to begin at that point. Use your judgement.
Horizontal Shift
This allows you to change the Horizontal texture offset (position of texture on a surface). You can type an offset value into field or use the scroll buttons on the right to shift the texture. If "Snap T to Grid" is set in Preferences, the scroll increments will move a number of pixels equal to the grid size.
Vertical Shift
This allows you to change the Vertical texture offset (position of texture on a surface). You can type an offset value into field or use the scroll buttons on the right to shift the texture. If "Snap T to Grid" is set in Preferences, the scroll increments will move a number of pixels equal to the grid size.
Horizontal Stretch
This allows you to change the dimensions of textures as they are mapped into the world. You can type a size value into field or use the scroll buttons on the right to enlarge or reduce the texture. The default value is 0.5. This gives a presentation in the game world of two pixels for each game unit. A Horizontal Stretch value of 1.0 would double the amount of area covered by a single repeat of the texture. Of course, doing that also reduces the apparent resolution of the texture by half (can you say blurry?)! Making the stretch value a negative number horizontally flops the texture's normals (i.e.; flops the texture left to right).
Design note: Textures are "projected" onto brush surfaces. This means that if a surface is angled, the texture stretches to fit the space upon which it is projected. To make the texture look "unstretched" you need to change the dimension so that it looks correct when stretched. Example: If you want to map a texture on a 45-degree angle, it should be scaled to 0.35 along the direction perpendicular to the axis of the angle.
Vertical Stretch
This is the same as for the Horizontal Stretch, but along the vertical axis. Making the stretch value a negative number vertically flops the texture's normals (i.e.; flops the texture up and down).
Rotate
This rotates the texture around the center point of the brush (or patch). If the texture is not centered on the map component, the rotation will not necessarily look correct. The increment of rotation is set by the value given for the Rotation Inc field on the Preferences window. The default value is 45 (degrees), roughly 1/8 rotation around the axis.
Value
This is used in conjuction with the light Surface Flag to designate the amount of light this face puts off.
Texturing
This next grouping of commands in the lower left corner of the window provides two separate sets of buttons. The top set deal with texturing geometry brushes. The lower set is for texturing curve patches.
-
Axial (Brush)
Realigns texture to the X and Y axes (removing the effects of rotation)
Fit (Brush)
The texture is stretched to fit the dimensions of the brush. The width and height fields to the right are the number of repetitions to be used in the S and T dimensions (S corresponds to X on the actual texture and T corresponds to Y on the actual texture). The default value for the height and width fields is 1. You can type a size value into field or use the scroll buttons on the right to enlarge or reduce the texture. Only integer values can be entered (meaning that you can't enlarge a texture 1.5 times).
CAP (Patch)
This function is most often applied to patches used to fill in the gaps between curves and solid geometry. It can also be applied to flat patches so that the texture doesn't appear to follow the arc of the patch. You may need to use the SHIFT + CTRL + N command to normalize the texture on the patch.
Set… (Patch)
This command functions almost like the "Fit" command above for brushes. The texture will be fit across the patch based on the X and Y values given. However, there is a notable difference. The X and Y fields will accept non-integer values (e.g. 6.4 x 3.8). It may take some experimentation to determine which dimension of your patch is considered to be "X" and which is thought to be "Y". If a value of 1x1 is given, the texture will be "fit" to the patch.
Natural (Patch)
The engine does its best to map the texture onto the patch in a "natural" appearing manner. This means that the texture will curve and flow with the curves and bends in the patch. Unless you are texturing a cap, this should be your first choice when applying a texture.
Fit
The texture's coordinates are mapped to fit the patch (with no repeats).
Surface flags and Content Flags
One of the coolest editing options in AnachroRadiant are the surface properties and content properties. They allow you to define in gme properties about a brush or face. Anachronox surface flags are defined in ref_gl.dll and content flags are defined in intellinox.dll for any interested programmers.
Differences between a surface property and a content property.
The main difference between surface and content properties is that surface properties can be applied to any number of a brush's faces. Content properties must be the same on every face of a brush.
For example, you could mark one brush face as light, or two face, or three, etc, but for a detail brush, every face must be marked as detail, or you will get an error when you compile the level ( Entity x, Brush x: mixed face contents ) Thanks autolycus for the above info.
What Surface Flags do
- light
This means that the face will emit light the color of the texture. So if you have a yellow texture emmiting light then the light will be yellow. This is probably the most often used and useful surface property. To set the brightness of the light you must enter the number of the brightness in the value edit box that should appear on most editors' surface properties windows'. This is a great alternative for creating your own light entities, because it is much easier and provides more realistic lighting effects.
The only thing that you should know is that sometimes depending on the size of the brush that will be emitting light you will have to set the brightness of the light very bright. Sometimes as high as 10000 is needed.
- sky
Disignates this surface is part of the skybox and should display the sky texture set in worldspawn. Give it a texture of e1u1/sky.
- slick
Slick will make the selected surface slippery and the player will slide. This will make the player keep walking for a bit even after the movement key is let go.
- warp
Makes the surface warp like water. Should be used when making water, forcefields, lava, etc.
- trans33, trans66
These make the selected surface transparent. 33 means 66 percent transparent, 66 means 33 percent transparent. So therefore trans33 is going to be more transparent then trans66.
- flowing
Is defined as unused in ref_gl.dll, but I have noticed it used in original Anachronox maps. Not sure yet what is does.
- nodraw
This is used for triggers and clip brushes. What it does is makes the selected surface invisible if it is a clip brush or a trigger such as a trigger_once and a trigger_multiple. Give this the texture of e1u1/nodraw. If it is a trigger then give it a texture of e1u1/trigger
By default though, triggers are already set to not drawn.
- hint
A hint brush blocks vis from seeing into certain areas, thus decreasing frame rate(which is a good thing) They are difficult to determine where to place though. There is a good tutorial written by Joel Caesar on hint brushes that will help you figure out how to use them.
They help determine the vis portals. It is used as a suggestion to the compiler during the vis phase, when the world is subdivided. Generally speaking, they are used to correct vis problems, whose chief symptom is the "hall of mirrors" effect seen during game play. These can often be corrected by careful placement of a hint brush. If you fill the volume where the error is seen or the volume adjacent to it, the problem may be corrected in the next compile. This is really more art than science. Give these the texture of e1u1/hint
- skip
A skip brush is very strage. It does nothing if a whole brush is set as a skip brush, but if you only set one face of it to a skip brush then it will create the effect of one way glass. The player on the side of the brush that is marked as skip will be able to see through the brush, but not shoot through it, and the player on the sides which are not marked skip will not be able to see through or shoot through the brush. Give these the texture of e1u1/skip
- snd_*
These flags control the sounds made when a player walks across a surface with one of these flags set. I don't believe these flags really do anything since any texture that has a sound related to it must be defined in anoxdata/textures/textureinfo.dat. So why are they listed here? I need to test if the flag must be set and the texture defined in textureinfo.dat for sound surfaces to work.
- alpha-banner
- alpha-test
- no v-turbelence
Disables vertical liquid turbulence if the brush has the water surface flag set.
- surf_scroll
Scrolls the surface texture across the face of the brush.
- half_scroll
Uses half the normal scrolling-speed.
- quart_scroll
Uses -25% (3/4) of the normal scrolling-speed.
- surf_fog
Declares the face as being a fog surface. Seems each face must be declared individually. If you select a brush and try to set all faces as fog, it doesn't set anything. Fog SURFACE is used to block or diminish player vision and provide "atmosphere" for a level. Like water, fog can affect game performance, especially if one can see additional shader effects within it. Unlike Quake III fog brushes will not work by simply giving a b_model the surface flag of "fog". Please see AnachroRadiant/Entity Descriptions/func_fog for full details about fog.
- surf_curve
What Content Flags Do
- solid
Solid is the default for all brushes. Not real sure on why you would have to use it though.
- window
Prevents the renderer from drawing the backfaces of a brush. Used on windows (or other transparent brushes.) For an example, look at the window at he very beginning of base1.
- water
Water is a content parameter that allows a player to "swim" inside a geometry brush, causing a pulsing visual distortion of the underwater geometry,.The water content flag gives the player the ability to walk through any brush with this content flag set.
The brush that has this property turned on will not actually warp like water until you also give the brush the warp surface flag. It will act the same way though without warp set(you will be able to walk through it) It's cool to use this attribute with different textures, like give the water attribute to a metal brush, etc for some strange different effects.
Water is a content parameter that allows a player to "swim" inside a geometry brush. In Anachronox this content flag simply allows the player to pass through the brush. While inside the brush the player can see all walls of the brush just as if they were in another room. The main change is that the player will beable to "swim" using the 'Q' key. Unfortunately this only appears as if the character is jumping, but is misterously suported by an unknown force. The current GDB allows to the player to remain underwater indefinatly.
Water usage rules:
- A water texture is defined by the presence of content flag water, and merly allows the player to pass through the brush, and use the 'Q' key to swim(jump) up while in the brush.
- Because water is typically a "transparent" surface, the shader passes used to create surface effects on water are added to the shader passes of textures seen through the water surface. This can significantly increase the number of redraw passes necessary to draw the game world and may negatively affect performance.
- If you place water brushes side by side, the touching sides must be marked with the common/nodraw texture.
- Both the top and the bottom surfaces of a water brush must be water texture.
- Water brushes cannot be stacked so they touch another water brush vertically, only set side by side.
- If you want to be able to exit water easily, keep the distance from the top of the water brush to the adjacent "shore" or pool edge at no more than 16 game units. Somewhat less is actually better.
- If fog is to be used as a part of a water volume, the water surface should not deform.
- mist
Mist makes the brush nonsolid, thus you could walk through it. You can also create a mist type effect by setting the mist, warp, and trans_33 properties on. Pretty cool.
- unused(16384)
This is where Laguna's Content flag data showed Areaportal to be. My testing shows it to be in the next slot. Futher testing required.
- areaportal
The bsp tool uses areaportals to create hard, visual breaks between areas in the map. Until triggered, the areaportal blocks geometry behind it from being drawn or seen. The area portal brush should be a thin (2 to 4 units thick) brush. It should touch all the brushes that form the hull of the opening being portalled. It must be placed inside a door. The opening of the door triggers the portal function. The closing of the door returns it to its former state. The areaportal texture must completely seal off a volume from another volume (although this can be in conjunction with other areaportals). If a door is being used to block off an area from view, consider placing an areaportal brush inside the door. Example in Quake III Arena: All the doors out of the central courtyard in Q3DM12, The Dredwerkz, are areaportalled. Give these the texture of e1u1/areaportal
- playerclip, monster clip
The player cannot walk through a brush set with player clip. Monster clip is the same thing but it affects the monster_ entities instead of the player. Good for not allowing monsters past a certain point or restricting the player so he/she cant get into areas in which there is a possibility of getting stuck. Give these the texture of e1u1/clip
You must also have nodraw set for the clip properties to work.
- current_0, _90, _180, _270, _up, _down
all the current properties are used to push the player in the selected direction(in water). So current_0 will push the player in the angle of 0, which is straight right.
The majority of the time current_ will be used along with the flowing and water properties to create the effect of flowing, moving water.
- origin
The origin property is used with certain entities like the turret_ entities, func_rotate , and func_door_rotating . Check those corresponding pages on how to use the origin property with these entities. Give these the texture of e1u1/origin
- monster
- detail
Detail brushes are very useful. They can be used to decrease vis time for a level. When a brush is marked as a detail brush, vis will ignore it, thus decreasing the amount of time that qvis3 will take while compiling your level.
Too many detail brushes though will actually slow a level down. Try to keep detail brushes restricted to brushes that the player will not often see.
There is a great tutorial over detail brushes and how to use them in more detail over at BSP Headquarters .
- translucent
if you have water and trans33 or 66 *not* set and the surface light flag 0 as well, then the water brush interior isn't lighted. when you set the translucent flag, light from outside can come inside although the water surface is not-see-thru. thanks Martin Fuchs
Greyed out Surface and Content flags are those originally supported by the quake II engine, but appear to be unused in Anachronox. More testing will be conducted to determine if this is correct.
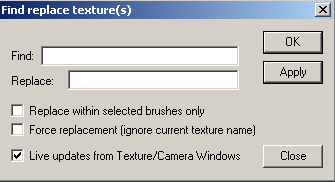 Selecting the command from the menu opens up a dialogue window. The top line is for the texture path and name of the texture to be replaced. The second line is for the texture to be used for replacement. Several checkboxes allow fine control over what, exactly, is to be changed. This command does not respond to UNDO. If you accidentally mistype a texture name in the replace line, you will need to enter it again (as mistyped) on the find line and then enter the correct texture on the replace line.
Texture replacement is global (throughout the map) unless the selected checkboxes state otherwise.
Replace within selected brushes only. Only the hi-lighted brushes that contain the texture to be replaced will be affected.
Force replacement (ignore current texture name). All textures in the map will be replaced. Best if used with Replace within selected brushes only. Be very careful with this one.
Live Updates from Texture/Camera windows. Using Live Update the user can find and replace textures with a fully point and click interface.
Click on the Find box, then click on any texture in either the Camera window or the Texture window. The texture path/name for that texture appears in the box. Next click on the Replace box and click on the replacement texture. That texture's path/name appear in the Replace box. Select "OK" and the replacement will occur.
Texture Lock(Menu: Textures->Texture Lock)
Opens a Pop-up window with two options for "locking" texture shifting during brush or patch movement.
NOTE: If you have selected the BRUSH PRIMITIVES option under Project Settings… then Texture lock will always be on.
-
Moves(Menu: Textures->Texture Lock->Moves)
(SHIFT+T)
When this option is checked, textures stay locked in position on the brush as brushes are moved around the map. If unchecked, the texture appears to shift across the brush, because they are fixed to the world, not the individual brush. On small brushes and small textures (such as the small square lights), some "creepage" may occur, with textures shifting 1 or 2 units off their locked position.
Rotation(Menu: Textures->Texture Lock->Moves)
(SHIFT+R)
When this option is checked, textures stay locked in position on the brush or brushes as they are rotated around the map. If unchecked, the texture appears to shift across the brush, because they are fixed to the world, not the individual brush. On small brushes and small textures (such as the small square lights), some "creepage" may occur, with textures shifting 1 or 2 units off their locked position.
Flush
The flush command frees up texture memory and should improve editor performance. Exactly how much is flushed depends on your choice of commands.
-
Flush All(Menu: Textures->Flush->Flush All)
This command flushes all the texture memory, restarts OpenGL and reloads the map from the last saved copy.
Flush Unused(Menu: Textures->Flush->Flush Unused)
This command flushes all UNUSED textures from memory.
| Texture Shift Down | (SHIFT+DOWN ARROW) |
| Texture Shift Up | (SHIFT+UP ARROW) |
| Texture Shift Left | (SHIFT+LEFT ARROW) |
| Texture Shift Right | (SHIFT+RIGHT ARROW) |
| Texture Rotate Clockwise | (SHIFT+PAGEDOWN) |
| Texture Rotate Counter-Clockwise | (SHIFT+PAGEUP) |
| Texture Scale Down | (CTRL+DOWN ARROW) |
| Texture Scale Up | (CTRL+UP ARROW) |
| Texture Scale Left | (CTRL+LEFT ARROW) |
| Texture Scale Right | (CTRL+RIGHT ARROW) |
NOTE: These textures should have been installed with the installation of Anachroradiant. Some of these textures are not supported by Anachronox, but have still been included until I can rule them out.
Areaportal
Color: Opaque Red Orange
Location: (textures/e1u1/areaportal)
The bsp tool uses areaportals to create hard, visual breaks between areas in the map. Until triggered, the areaportal blocks geometry behind it from being drawn or seen. The area portal brush should be a thin (2 to 4 units thick) brush. It should touch all the brushes that form the hull of the opening being portalled. It must be placed inside a door. The opening of the door triggers the portal function. The closing of the door returns it to its former state. The areaportal texture must completely seal off a volume from another volume (although this can be in conjunction with other areaportals). If a door is being used to block off an area from view, consider placing an areaportal brush inside the door. See AnachroRadiant/Working with Textures/Content Flags and
AnachroRadiant/Entity Descriptions.
Caulk
Location: (textures/e1u1/caulk)
Color: Opaque Pink
Game Function: Caulk, the miracle texture. It blocks vis. It seals the world off from the void. It doesn't draw (so it doesn't add to triangle counts). It keeps curves from competing with textures behind them. It looks like hell if you see it in your world. From the View menu (View > Show > Caulk), you can toggle on and off the display of caulk brush sides.
Every face that will not be viewable by the player and does not have some other texture or content/surface flag should have this. Please note that caulk was not used in Anachronox maps.
More Design Tips: Finally, and this should be used with great care, a caulk brush can be used to create an invisible support for entities. If you place a very thin caulk brush floating above a surface that would otherwise not support an entity (example: a grate made of clip brush), the brush will not draw in the world, but will support the entity. The reason for this is that SUSPENDED entities are not "seen" by bots unless they can be reached by a jump pad.
Clip
Location: (textures/e1u1/clip)
Color: Transparent Red
Game Function: If you look at a professionally made map, quite often you'll see that nearly every bit of wall surface is covered in a transparent red texture called "e1u1/clip." Clip is a nondrawing texture that blocks player movement.
Hint
Location: (textures/e1u1/clusterportal)
Color: Transparent Yellow Green
Game Function: Helps determine the vis portals. It is used as a suggestion to the compiler during the vis phase, when the world is subdivided. Generally speaking, they are used to correct vis problems, whose chief symptom is the "hall of mirrors" effect seen during game play. These can often be corrected by careful placement of a hint brush. If you fill the volume where the error is seen or the volume adjacent to it, the problem may be corrected in the next compile. This is really more art than science.
Origin
Location: (textures/e1u1/origin)
Color: Opaque Orange
Game Function: Used to create origin point in moving b_models, such as trains, plats, and rotating objects. This texture, applied to a square or rectangular brush, is used to create the point of origin for moving b_models, such as trains, plats, and rotating objects. It is used by func_trains as the point that passes through path entities and the source for sound attachment
Skip
Location: (textures/e1u1/skip)
Color: Transparent yellow
Game Function: This texture is used in maps to discard sides of hint brushes.
Slick
Location: (textures/e1u1/slick)
Color: Translucent Pale Blue
Game Function: Not stick coating for map surfaces. Reduces friction. Use like a very thin clip brush over surfaces you want to be low friction.
Trigger
Location: (textures/e1u1/trigger)
Color: Transparent Dark Yellow
Game Function: Used to make trigger brushes.